
From the Peninsular to the jungle
- OSHIROblog

- Mar 12
- 4 min read
Several years ago we had a brief sojourn to the jungle and the 80's films involving drug cartels in South America. Our take was definitely tongue in cheek as the actual subject matter can be delicate. It has been mentioned to potentially get this going again and I thought it would be a good idea to do a few new builds for it using products from the catalogue.

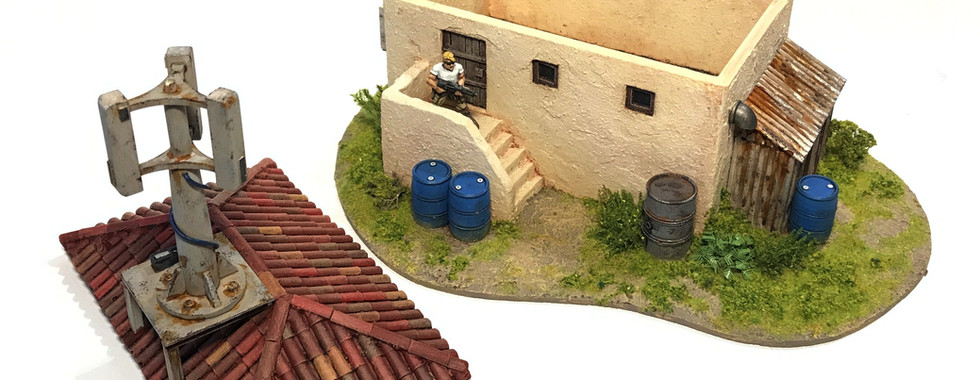
The first one is of a small house which would be part of a hacienda and it will use the medium cottage from the Peninsular range along with a selection of items from the Urban Future additions range.
The parts list is quite small as there will be some scratchbuilding involved and only a few parts will be needed to make the building look like it belongs in the South American jungle. PN01, UFA02&03 and UFA05 (one of each), UFA15, a few of UFA16 and a converted UFA42. I've also added an oil drum from a 1:35 WWII kit.

For the roof, I went with a darker look than with the Peninsular builds, this should help to differentiate it from them enough. It was primed in Halfords red primer (no longer available sadly) and then around seven or eight different colours were chosen to pick out some of the individual tiles. This was then given a wash with GW earth ink and was mostly wiped off before it dried. The final thing was to drybrush the whole roof with a pale orange.

The main building was primed with with Colour Forge Wight Bone and once dry it was given a light wash with some watered down GW earth ink. After wiping most of it off with a tissue, a light drybrush with some Pro Acryl white on a soft brush was applied all over. The interior floor was painted at the same time but with a base coat of GW Karak Stone. The doors and window frames were picked out with a generic brown and drybrushed with a generic tan.

The UFA bits were all primed in their respective colours, given a wash with the ubiquitous GW earth ink. For the weathering I use a very dark brown and a small piece of torn sponge. With a pair of tweezers a little of the brown paint is added to the sponge and most is dabbed off onto a scrap bit of material. This is then dabbed over the pieces. The same is done with GW Runefang Steel. To finish off, some subtle areas are given a quick bit of rust with a fine brush. I did have my own mix of rust but now use DirtyDown rust (shake very well).
For the comms tower I took the wind turbine and added some simple styrene blocks to represent the comms units. I also made a small platform from styrene so it can sit on the roof flat. This was done with a plate of 1mm and some styrene 'H' beam lengths cut to the right angles to allow for the pitch of the roof. It was given a coat of CF Ghoul Grey and then I used the same weathering technique as above.

The lean to was made from 1.5mm mounting card and corrugated card. The former was cut from the 1.5mm and then clad with the corrugated. It was sprayed with CF Ghoul Grey and given a liberal weathering with the sponge and rust (as mentioned above). It was stuck to the base and building before the ground work was applied
The base is the usual 3mm mdf, cut to size and chamfered with a craft knife. This base is a bit more random than the usual ones I do as I want to give the impression that it would be in the jungle and not really an urban area.

My usual gloop was applied to the base, taking care not to get it over the walls and left to dry. The colours used were the same as in the other tutorials (warm grey base then lighter shades of brown/tan). The little details were added when the gloop was wet. For the flocking, I applied some normal grass but as this is for the jungle some liberal application of tufts and bushes was needed. Gamers Grass is my go to but I do have a selection from other suppliers (both wargaming and railway modeling) to help break up the monotony.
I also have a coarser flock and this was applied in various places to help give the impression of unfettered undergrowth A cheap palm tree and some larger bushes were drilled into the base and some other bits of odd foliage were added to really give an overgrown feel. A quick coat of W&N spray vanish to help protect the flock and take some of the sheen off and it's ready to play. One small caveat is that the jungle bases surrounding the model aren't mine (as I haven't actually made any yet), they were loaned from a friend for the photos.
I hope this little tutorial has given you some inspiration for your own jungle builds. The elements used could also be for a more arid setting for conflicts in the middle east although that's not a preference for me personally. Usual little gallery below.


cheers
James
OSHIROmodels


I always enjoy and appreciate your historical/modern or historical/sci-fi terrain pieces.